TL;DR
Acoustic dampening isn’t the same as soundproofing. The biggest noise reduction comes from moving your rig to another room or closet. Proper placement and ventilation are key for a quiet, effective setup.
Ever wish your noisy GPU rig could disappear into the background? The truth is, the best way to quiet your setup isn’t always more foam or fancy panels. It’s about *where* you put it.
This article shows you how to shrink noise, improve sound, and set up a rig in your closet — without turning it into a sauna or echo chamber. If you’re tired of constant fan whine or boomy reflections, stick around. You’ll get real, actionable tips to make your space quieter and your recordings clearer. For more tips, check out this guide on acoustic dampening and placement.
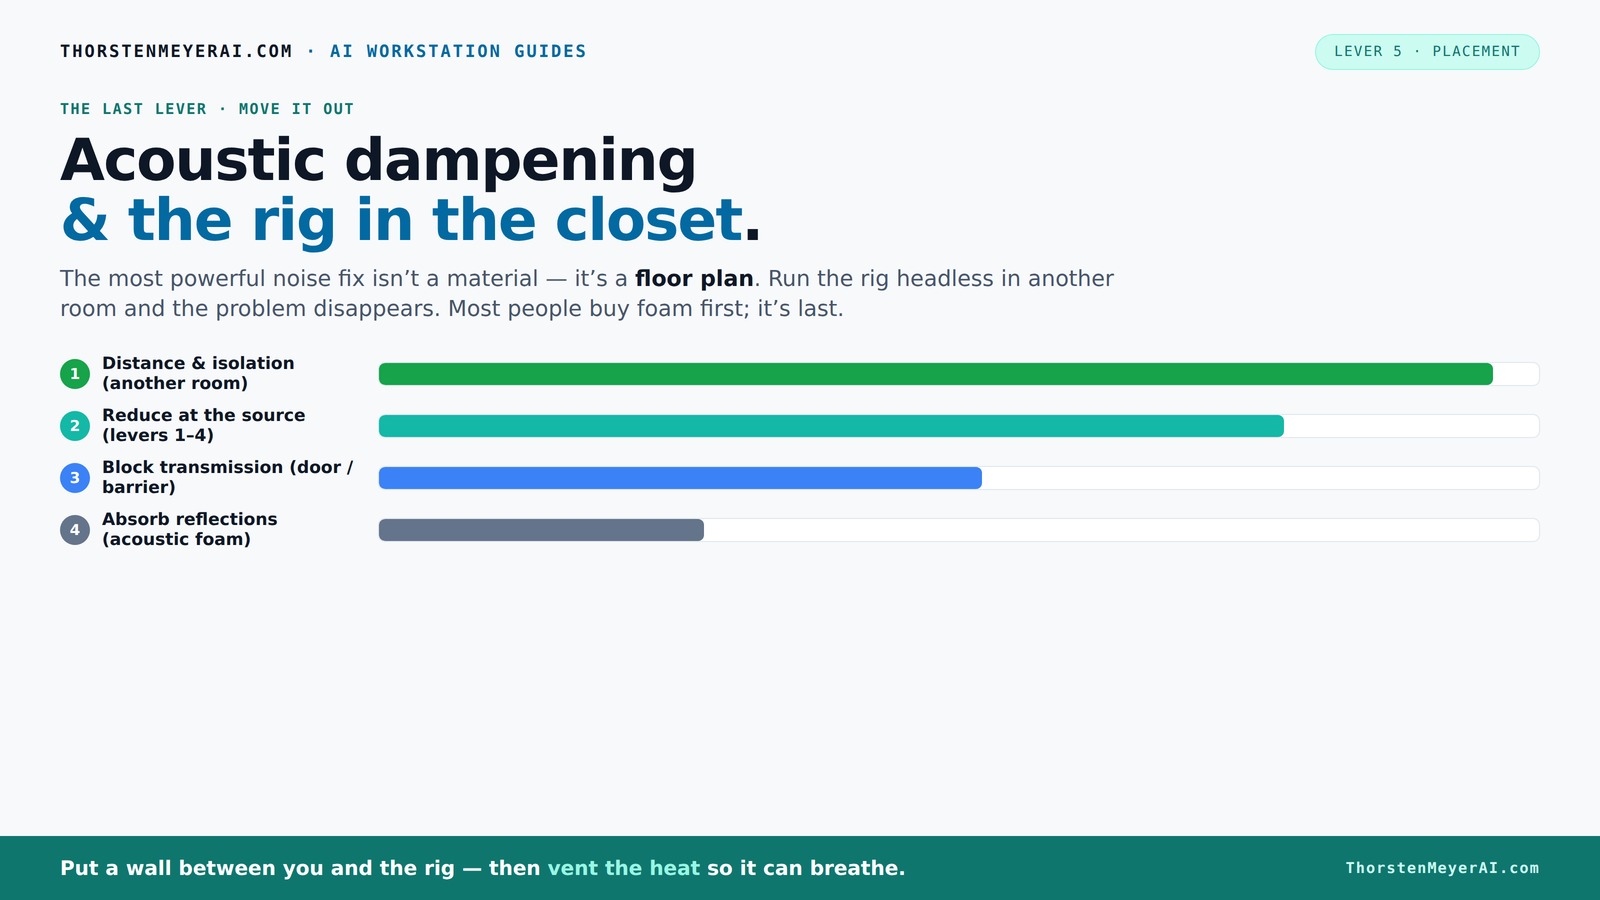
Acoustic dampening
& the rig in the closet.
The most powerful noise fix isn’t a material — it’s a floor plan. A rig you can’t hear because it’s in another room beats any amount of foam. Tap the approaches in Part 1 to see what actually works.
(another room)
(levers 1–4)
(door / barrier)
(acoustic foam)
Contain the noise, not the heat
Key Takeaways
- Moving your rig into another room or closet dramatically cuts noise — often more than foam panels alone.
- Proper placement of acoustic panels at reflection points reduces echo and boxiness.
- Ventilation is crucial when placing a hot, loud machine in a closet — passive vents or exhaust fans are must-haves.
- Sealing gaps with weatherstripping or acoustic sealant prevents outside noise leaks in small spaces.
- Bass traps help control low-frequency buildup in small, reflective closets, avoiding muddiness in recordings.

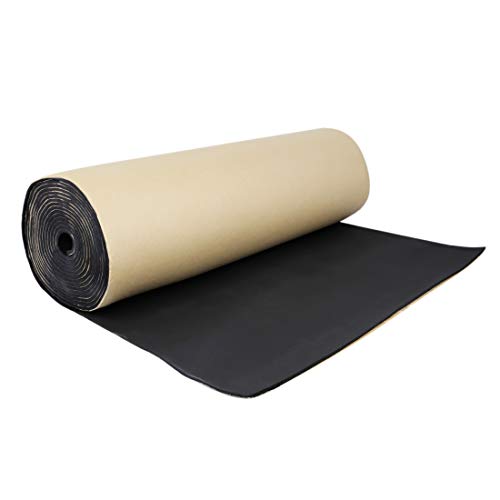
Focusound 52 Pack Acoustic Foam Panels 1" x 12" x 12" Sound Proof Foam Panles Soundproofing Noise Cancelling Wedge Panels for Home Office Recoding Studio with 300PCS Double-Side Adhesive
Soundproofing - Acoustic foam panels triangular grooves structure for better noise absorption, helps to reduce and absorb unwanted...
As an affiliate, we earn on qualifying purchases.
As an affiliate, we earn on qualifying purchases.
Why Distance Is the #1 Noise Killer (Better Than Foam)
Distance is the simplest, most effective way to cut noise. Just like shouting across a field is quieter than whispering in a closet, moving your rig into another room can make it virtually inaudible from your workspace.
Imagine your GPU tower sitting happily in a basement or spare room, while you work peacefully upstairs. The noise difference? It’s significant — often over 90% quieter. This is why most professional studios keep their gear in separate rooms and control the sound by *distance* first.
Think of it like a big barrier. You don’t need fancy foam if your rig’s in another part of the house. Your primary goal: create a physical gap between the noise source and your ears.
However, this approach also has tradeoffs. Moving your equipment away can mean longer cable runs, potential interference, or logistical challenges. It might not be feasible for all setups, but understanding the impact helps you decide whether relocating is worth the effort compared to treating your existing space.
uxcell 236mil 6mm Audio Stereo Sound Acoustic Noise Absorbing Mat Dampening Mat 19.7"x31.5"
Liner has the same characteristics and excellent noise insulator properties as rubber foam. It absolutely doesn't absorb water...
As an affiliate, we earn on qualifying purchases.
As an affiliate, we earn on qualifying purchases.
How to Turn Your Closet Into a Quiet, Functional Rig Space
Placing your rig in a closet is a smart move — but only if you handle heat and airflow. The biggest challenge? Trapped heat turns your closet into a mini sauna, which kills hardware and increases noise from fans.
Here’s a quick step-by-step:
- Pick a closet with good airflow, not sealed tight.
- Add ventilation — a small exhaust fan or vent to let hot air escape.
- Seal gaps around doors and panels with weatherstripping or acoustic sealant.
- Use passive cooling, like a vented panel, or an active exhaust fan for hotter setups.
- Place the rig on anti-vibration pads or rubber feet. This reduces structure-borne hum.
Proper ventilation is critical because without it, heat buildup not only risks hardware failure but also causes your fans to work harder, generating more noise. The tradeoff here is balancing cooling with noise isolation—adding vents or fans can introduce new sound pathways if not properly sealed. For more on cooling solutions, check out this guide.
For more on cooling solutions, check out this guide. It’s all about keeping your hardware cool and quiet.

Audimute Soundproofing Acoustic Door Seal Kit - Door Sweep and Seal - (Standard Size)
Includes a Door Seal (3/16" x 1/2" x 25') and a Door Sweep (1/2" x 1.5" x 4').
As an affiliate, we earn on qualifying purchases.
As an affiliate, we earn on qualifying purchases.
Acoustic Treatment vs. Soundproofing: What Your Closet Really Needs
Acoustic dampening and soundproofing are often confused, but they serve different purposes. Acoustic treatment enhances the sound quality inside the room by reducing echoes, reverberations, and boxiness, which makes recordings clearer and more professional. If you're interested in improving your room's acoustics, visit this resource on acoustic dampening.
In a closet, your main focus should be on acoustic dampening: adding panels at reflection points, sealing gaps, and reducing echo. This improves the clarity of your recordings and prevents unwanted room resonances. To learn more about acoustic treatment options, visit this resource on acoustic dampening.
The key implication here is understanding your priority: if your goal is better recordings within the space, dampening is sufficient. If you need to block out external noise or prevent your noise from disturbing others, then soundproofing strategies are necessary. Knowing this helps you allocate your budget and effort more effectively.

TroyStudio Speaker Isolation Feet, 1.2" (8 Pcs) EVA Acoustic Foam Pads for Studio Monitor Pair, Turntable Isolation Base to Reduce Vibration & Resonance, Non Slip Spikes for Desktop, Home Theater
【SPECIFICATION】: Featuring a discreet 1.2 inch diameter and equipped with powerful self-adhesive backing, each set of 8 isolation...
As an affiliate, we earn on qualifying purchases.
As an affiliate, we earn on qualifying purchases.
Where to Place Acoustic Panels in a Closet for Best Results
Positioning panels where sound bounces is key. The first reflection points are your best targets — the spots where sound hits a wall and bounces straight back to your mic or ears. For detailed guidance, see this guide on acoustic panel placement.
To find these points, do the mirror trick: sit in your recording position, and hold a mirror against the wall. When you see your speakers or mic in the mirror, that’s where you put a panel. Proper placement reduces early reflections that cause comb filtering and echo, resulting in a clearer, more focused sound.
Start with:
- Side walls — at reflection points
- Behind the mic or speakers — to tame reflections
- Ceiling above the recording spot — if the room sounds boxy
Using 2-inch panels for vocals and general recordings strikes a good balance between absorption and cost. Thicker panels or bass traps in the corners can further improve low-frequency response, reducing muddiness and boominess that often plague small, reflective spaces.
Tradeoffs include potential over-absorption, which can make the space sound dead if not carefully planned. Also, placing panels too close to your ears or mic can affect the natural sound, so strategic placement is essential for achieving a balanced, professional sound. For more insights, see this article on acoustic treatment.
Frequently Asked Questions
Is acoustic dampening the same as soundproofing?
Not quite. Acoustic dampening improves sound quality inside the room by reducing echoes, reverberations, and boxiness, which makes recordings clearer and more professional. Soundproofing, on the other hand, aims to prevent sound from escaping or entering, which is crucial if external noise leaks in or your neighbors are sensitive to your noise levels. In a closet, focusing on dampening typically yields the best results for recording clarity, while soundproofing is more relevant if external noise intrusion or disturbance is an issue. Combining both strategies is ideal if your goal is a truly isolated environment, but for most home studios, prioritizing dampening is sufficient and less invasive.Where should I place acoustic panels in my closet studio?
Start with the reflection points — the walls directly facing your mic and speakers. Use the mirror trick: sit in your recording position, and hold a mirror against the wall. When you see your speakers or mic reflected in the mirror, that’s where you should place panels. These locations are where sound bounces and causes early reflections, which can muddy recordings. Also treat the wall behind your mic and the ceiling if the room sounds overly echoey or boxy. Proper placement reduces these problematic reflections, resulting in a clearer, more controlled sound. Remember, the goal is to absorb or diffuse sound at points where it first bounces, rather than covering every surface excessively, which can make the space sound unnaturally dead.Do I need bass traps in a small closet?
Yes, especially if you notice that your recordings have a boomy or muddy quality. Low frequencies tend to build up in small, enclosed spaces with parallel walls, creating standing waves that cause uneven bass response. Bass traps are thick panels or foam designed specifically to absorb these low-end waves, preventing them from bouncing back and causing muddiness. Installing bass traps in the corners of your closet can significantly improve the overall sound clarity and balance, making your recordings sound more natural and professional. The tradeoff is that neglecting low-frequency treatment often results in a hollow, boxy sound that’s difficult to correct later, so investing in bass trapping is a worthwhile step for a more accurate and pleasing sound.How many panels do I need for a closet studio?
The number of panels depends on your specific space and goals, but generally, partial coverage—around 20–40% of the wall surfaces—can make a noticeable difference. Focus on placing panels at reflection points, especially on side walls and behind your mic, to reduce early reflections that cause comb filtering. Adding a few bass traps in the corners will help low-frequency control. Keep in mind that more panels aren’t always better; over-absorbing can deaden the room and make it sound unnatural. Instead, aim for strategic placement that balances absorption with room liveliness, ensuring your recordings are clear without sacrificing natural sound. Experimenting with placement and listening critically will guide you toward the optimal number for your space.Can I make a closet studio without heavy construction?
Absolutely. You can significantly improve your closet studio using DIY solutions like hanging blankets or quilts to reduce reflections, placing rugs to dampen ground bounce, and sealing gaps around doors and vents with weatherstripping or acoustic sealant. Reflection filters around your microphone help focus sound and reduce room reflections, while portable bass traps can be added without any permanent modifications. These methods are cost-effective, easy to implement, and highly adaptable, making them ideal for small spaces and those unwilling or unable to undertake extensive renovations. While they may not provide complete soundproofing, they can dramatically enhance your recording quality and make your space much more manageable acoustically.Conclusion
Putting your rig in another room or a well-ventilated closet can turn a noisy, echo-prone space into a quiet, professional-sounding workspace. The key is combining distance, proper placement, and smart treatment.
Remember: noise reduction isn’t about overhauling your entire room — small, strategic moves often make the biggest difference. Your perfect quiet setup is just a few practical steps away. Now, go turn that closet into your new secret weapon for pristine sound.